2023-04-11

Protected: Software

Nüvü Camēras offers a comprehensive and easy-to-use Graphical User Interface (GUI), NüPixel, and a Software Development Kit (S⁣D⁣K⁣) for all Nüvü Camēras’ products.

Thanks to NüPixel, plug-and-play acquisitions can be done to quickly adjust an experiment setup, monitor camera components, save images, and more. Even advanced camera functions like Fast Kinetics Mode or T⁣D⁣I⁣ acquisition become simple to use on Nüvü’s interface.

Following are images showing highlight features of the NüPixel software.

Multiple regions of interest (mROI)

NüPixel allows the use of m⁣R⁣O⁣I⁣ with Nüvü Camēras’ HNü 128, 512, and 1024 E⁣M⁣C⁣C⁣D⁣ cameras.
Easily set up multiple areas of interest to enhance the acquisition frame rate, and record data only for specific regions of the sensor.

The m⁣R⁣O⁣I⁣ feature allows the selection of specific areas of the detector performing acquisitions according to the activity across the field of view. The result is faster acquisitions as only the pixels of interest are read. Furthermore, users can position up to 9 fully customizable ROIs on the detector all at once. Better, this new feature maintains Nüvü Camēras’ unparallelled sub-electron noise and supports simple ⁣p⁣h⁣o⁣t⁣o⁣n⁣-⁣c⁣o⁣u⁣n⁣t⁣i⁣n⁣g⁣ imaging at faster frame rates for ultimate sensitivity.

Protected: Software
mROI in NüPixel

TDI acquisition

Nüvü Camēras is the only E⁣M⁣C⁣C⁣D⁣ manufacturer that allows the combination of T⁣D⁣I⁣ acquisition with E⁣M⁣ ⁣g⁣a⁣i⁣n⁣. To do so, simply select an EM T⁣D⁣I⁣ readout mode, add an external trigger, and start acquiring T⁣D⁣I⁣ images.
This unprecedented combination permits the coupling of Photon Counting with a T⁣D⁣I⁣ acquisition.

Also available in conventional readout mode.

Please refer to this article for more information on the T⁣D⁣I⁣ mode fundamentals, and on the reasons why it is interesting to make this readout mode available for E⁣M⁣C⁣C⁣D⁣ sensors. Nüvü’s FAQ on T⁣D⁣I⁣ mode provides further information about the Time-Delay Integration mode itself.

The T⁣D⁣I⁣ mode is not a default and is an option that must be ordered with the camera.

Protected: Software
TDI mode acquisition in NüPixel. The camera is imaging a sheet of paper with Nüvü Camēras written on it. It appears as a vertical blur, since it is not moving.

Fast Kinetics Mode (FKM) acquisition

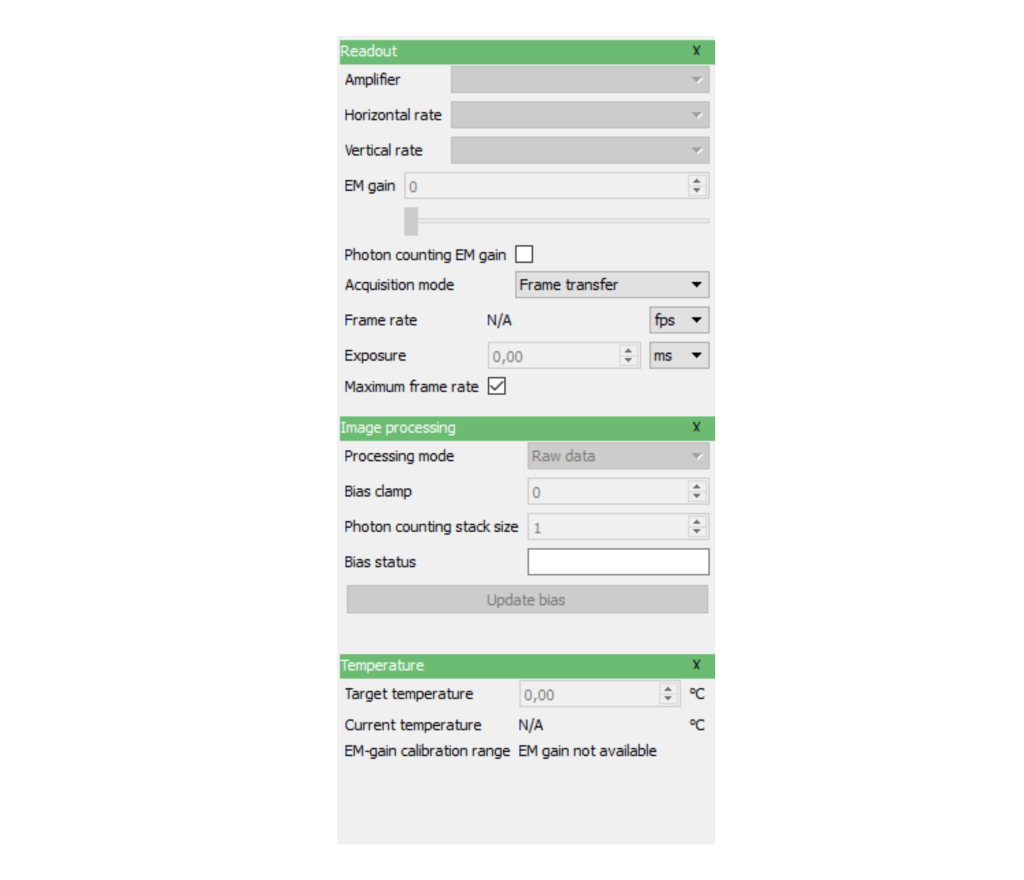
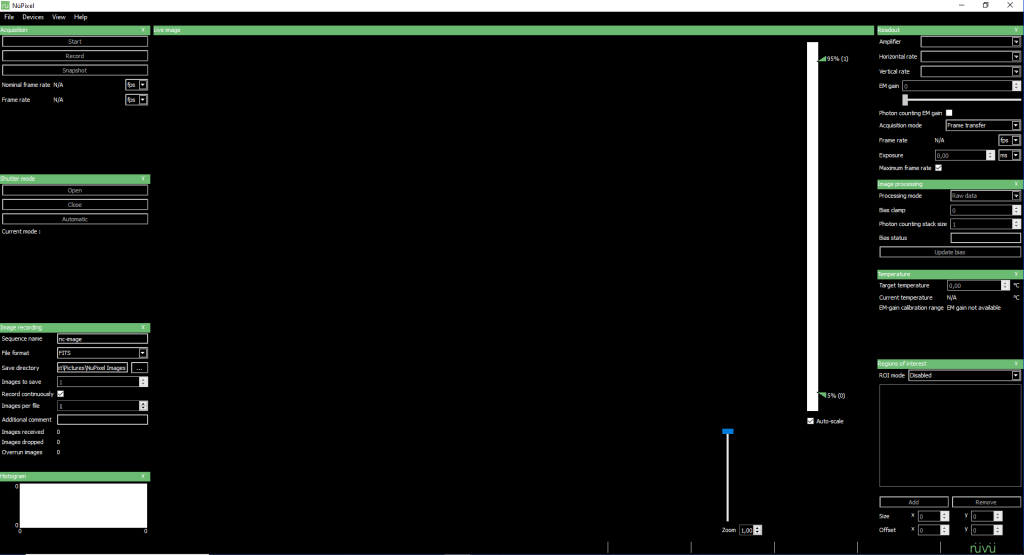
Easily set up an FKM acquisition in NüPixel. FKM enables bursts of acquisitions with E⁣M⁣C⁣C⁣D⁣ cameras, with exposure times down to tens of microseconds.

There are two distinct areas in an E⁣M⁣C⁣C⁣D⁣ sensor: the imaging area and the storage area. In a regular (non-FKM) acquisition, once an image is acquired in the imaging area, it is shifted to the storage area before being readout. Then another image can be acquired in the imaging area. For E⁣M⁣C⁣C⁣D⁣s⁣, the whole process takes at best tens of milliseconds.

With FKM, a specific region of the imaging area is illuminated, the rest staying hidden from light thanks to a physical optical mask. An image is acquired in this region, and then the image is shifted just enough to be out of the illuminated area. Another image can therefore be quickly captured on the sensor, which is also shifted down outside of the illuminated zone. The process repeats itself for as many images as the user asked for the FKM burst. Once all the required images are exposed, all images are read at once. This enables the acquisition of short bursts of images with microsecond exposure times.

Of course, the maximum number of images in a sequence is limited by the position of the sub-area illuminated, the height of the sub-area, and the number of pixel lines on the sensor (counting the imaging plus the storage area).

The FKM is not a default and is an option that must be ordered with the camera.

Protected: Software
FKM image bursts (without optical mask)

Cropped-sensor mode

Cropped-sensor mode acquisition is available to boost even further the frame rate performance of the camera.

The Cropped-sensor mode shares many similarities with the R⁣O⁣I⁣: the user performs acquisitions with only a fraction of the detector area. However, whereas R⁣O⁣I⁣ only defines these regions electronically, such that the detector still collects p⁣h⁣o⁣t⁣o⁣e⁣l⁣e⁣c⁣t⁣r⁣o⁣n⁣s⁣ from across the sensor’s entire area, the cropped-sensor mode must instead be used with a physical optical mask, which shields the unwanted region from photons.

In other words, the E⁣M⁣C⁣C⁣D⁣ must detect no light in the masked area, which translates into no p⁣h⁣o⁣t⁣o⁣e⁣l⁣e⁣c⁣t⁣r⁣o⁣n⁣s⁣ (in contrast to R⁣O⁣I⁣ mode, where the sensor’s entire area may remain illuminated). Thus, unexposed pixels distributed on either side of the region defined by the optical mask will have detected no photons: their value is null. As such, the camera does not need to read an entire row but can instead ignore the unexposed pixels entirely.

This results in the virtualization of a smaller sensor, one limited to only the exposed region. Doing so further increases the acquisition speed compared to the R⁣O⁣I⁣ mode. Note that m⁣R⁣O⁣I⁣ is currently not supported in cropped sensor mode.

Protected: Software
Crop mode section in NüPixel, with ROI enabled on an HNü 128 Gamma

Binning

Pixel binning is reading the detector’s pixel rows or columns in groups of two or more. Doing so leads to greater readout rates, as fewer pixels are scanned, as well as decreased readout noise, especially in low-light conditions, because summing p⁣h⁣o⁣t⁣o⁣e⁣l⁣e⁣c⁣t⁣r⁣o⁣n⁣s⁣ in multiple pixels increases the signal. However, binning is a trade-off that offers a higher frame at the cost of decreased spatial resolution.

Horizontal binning happens in the detector’s serial register. The camera reads and combines several pixel values into one, and then sends this value to the computer. Due to the E⁣M⁣C⁣C⁣D⁣ architecture, horizontal binning does not increase the camera speed at high readout rates (10, 20, and 30 MHz) in EM mode as the serial register speed is limited by the controller’s horizontal pixel rate.

Vertical binning groups contiguous pixels in the same column during the readout process. The camera then reads the summed pixels as one. Contrary to horizontal binning, high pixel rate EM operations benefit from vertical pixel binning. As a rule of thumb, the camera speed increases linearly with the number of grouped pixels.

Enable binning X and/or binning Y in one click in NüPixel thanks to the “B⁣i⁣n⁣n⁣i⁣n⁣g⁣” section.

Protected: Software
Binning 4x4 in NüPixel

Modularity

NüPixel is organized in different sections, with a default layout. Its modular environment allows for a complete space reorganization between sections. A new layout can be established, and saved for quick loading, later, to work with a familiar environment, or an environment adjusted for a specific experiment.

Protected: Software
Some sections in NüPixel

Camera detection and connection

NüPixel greatly facilitates the detection and connection to Nüvü Camēras’ products.
If one or more of Nüvü’s cameras are connected to the computer where the software is installed and switched ON, NüPixel will automatically detect the cameras and enumerate them when launched.

After choosing a camera and establishing a connection, images can easily be acquired by the GUI, to adjust the setup for an experiment for example. NüPixel makes it straightforward to acquire images with Nüvü’s cameras out of the box: once connected to the camera, press on the “Start” button and enjoy live image streaming.

Protected: Software
List of available cameras in NüPixel

Image recording

Save a single image, multiple images, or realize a continuous acquisition thanks to the parameters of the “Image recording” section. Statistics are also available to know if some images were lost during the acquisition.

Protected: Software
Image recording section

Acquisition parameters

The “Readout” section allows control over acquisition parameters. Conveniently switch between conventional readout mode and E⁣M⁣ ⁣g⁣a⁣i⁣n⁣ readout mode. Horizontal and vertical acquisition frequencies combination are also available in this section, as well as Exposure time and Blanking time parameters, which are essential for an acquisition.

Protected: Software
Readout section

Image processing

Bias Subtraction

Enable bias subtraction processing without a thought thanks to the “Image processing” section. Simply switch to “Bias subtraction” processing mode and click on the “Update bias” button.

The bias subtraction is a process that is very common in imaging applications (basically every type of camera uses it). It is therefore not unique to Nüvü Camēras. Nüvü Camēras’ competitors do not give the choice to their users and apply this correction no matter what, but Nüvü Camēras offers the possibility to record raw images as well because of some of Nüvü’s customer requirements.

More information on the bias subtraction process can be found here.

Protected: Software
Image processing section with bias subtraction

Photon Counting

Photon Counting is equally simple to use. Still in the “Image processing” section, select the “Photon Counting” processing mode, choose a p⁣h⁣o⁣t⁣o⁣n⁣ ⁣c⁣o⁣u⁣n⁣t⁣i⁣n⁣g⁣ stack size, and get ready to acquire images. Since individual p⁣h⁣o⁣t⁣o⁣n⁣ ⁣c⁣o⁣u⁣n⁣t⁣i⁣n⁣g⁣ images are binary, the stack size is the parameter that indicates how many p⁣h⁣o⁣t⁣o⁣n⁣ ⁣c⁣o⁣u⁣n⁣t⁣i⁣n⁣g⁣ images will be summed to retrieve the final image, therefore granting a proper dynamic range.

Photon Counting is very useful for extremely light-starved applications, with photons fluxes inferior to 1 photon/pixel/frame.

More information on Photon Counting can be found here.

Protected: Software
Image processing section with Photon Counting

Histogram visualization

Conveniently analyze the image histogram thanks to the “Histogram” section.
It can be useful to spot groups of marginal pixels that may affect the contrast in an image.

Protected: Software
Histogram of bias subtracted image centered on 300 ADU in NüPixel (shutter closed)

Trigger settings

Multiple trigger options are available with Nüvü Camēras’ products.

If no external trigger is required to launch acquisitions, the camera can work with its internal trigger. In that user case, the camera will acquire images as fast as possible, depending on the exposure and blanking time settings.

If an external trigger is required, different modes can be used:

  • External: a low to high transition received through the TRIGGER IN input begins an image acquisition. The total exposure time is determined by parameters set up by the user via NüPixel or Nüvü Camēras’ S⁣D⁣K⁣.
  • Exposure: a low-to-high transition received through the TRIGGER IN input begins an exposure. The acquisition only ends upon receiving a subsequent high-to-low transition through the TRIGGER IN input and the image readout then begins. This control mode is not available in the Photon Counting mode.
  • Continuous: a low-to-high transition received through the TRIGGER IN input begins the first exposure and subsequent low-to-high signals received through
    the TRIGGER IN input initiate the readout of an image. The camera continues with the next exposure immediately (after the short frame-transfer portion of the readout) such that the exposure depends upon the interval between successive trigger signals.

For the three control modes previously mentioned, the trigger condition can be modified from “Low to High” to “High to Low”.

Protected: Software
Trigger section with "External" trigger option selected

Image transformation

Apply transformations to the live image stream for better visualization during an experiment. The image can be rotated up to 270°, and X-axis and Y-axis symmetry can be set up, or XY-axes symmetry at the same time.

Protected: Software
Transformation section

Temperature control

Control the operating temperature of the camera by entering a setpoint value in the “Temperature” section.

To diminish the t⁣h⁣e⁣r⁣m⁣a⁣l⁣ ⁣n⁣o⁣i⁣s⁣e⁣ of the camera detector as much as possible, it is important to deeply cool it, via air or liquid cooling.

More information on the t⁣h⁣e⁣r⁣m⁣a⁣l⁣ ⁣n⁣o⁣i⁣s⁣e⁣ can be found in the E⁣M⁣C⁣C⁣D⁣ tutorial page, in the E⁣M⁣C⁣C⁣D⁣ noise sources section.

Protected: Software
Temperature section

Dark theme

It is possible to alter the background color of the entire GUI, by loading a dark theme included with the installation. A dark theme can be appropriate in an environment where there is little light, and where a dark background is more restful for the eyes.

Protected: Software
NüPixel dark theme

Installation

Installation guides and the installation executables can be found on the USB drive offered with Nüvü Camēras’ products. Instructions must be followed for simple manipulation depending on the operating system (Windows or Linux).

Plugin installation must be done after the Nüvü Camēras’ software package has been properly installed, to allow the camera to be visible to the computer.